Build Your Own Beehive Stand
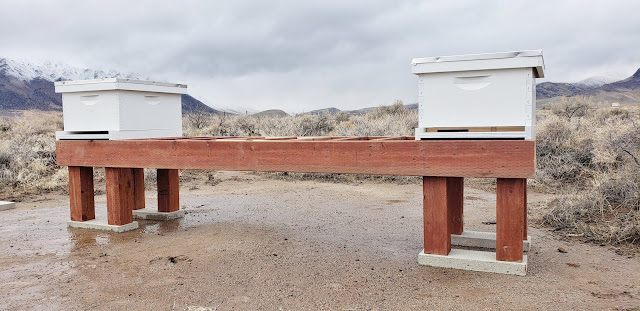
Spring seems forever away as we wait for a big winter storm to hit this evening. But we had to move our new beehive stand out of the garage to make room for, you know... our cars.
We designed and built this hive stand for the two colonies we'll be introducing to the apiary in a couple months.
The slats give us a place to move the boxes (supers and deeps) to as needed and we included a hanger in the center so that there's a place to put sticky frames as we work with the bees.
Hopefully the bees will like it! We'll find out when they get here in April.
Want to build your own hive stand? Click here to download the plans.
 This beehive stand will hold two hives, one on each end, and is easy to make. We opted to use treated lumber, but if you don’t be sure to paint or weatherproof the bench in some way. The 2x4 slats allow for a place to sit supers or deeps as you work. One of our favorite features of this bench is that there are blocks in the center that act as hangers for hive frames. So, when you’re working with the bees you can hang 1 or 2 frames on the bench, if needed. We opted to place concrete caps under each 4x4, so that the wood is off the ground. You could use another kind of stepping stone for this, if you wish. You can also adjust the height of the bench to your preference.
Supplies
We designed and built this hive stand for the two colonies we'll be introducing to the apiary in a couple months.
The slats give us a place to move the boxes (supers and deeps) to as needed and we included a hanger in the center so that there's a place to put sticky frames as we work with the bees.
Hopefully the bees will like it! We'll find out when they get here in April.
Want to build your own hive stand? Click here to download the plans.

Supplies
- 3 - 2x6 lumber
- 2 - 4x4 lumber
- 2 - 2x4 lumber
- 1x3 scrap (Four 6.5 inch pieces)
- 2.5 in deck screws
- Wood sealer or exterior paint
- Paint brush
- Concrete toppers
Tools
- Chop saw
- Driver
- T square
- Tape measure
Instructions
- Cut 4x4’s into eight 18 inch lengths.
- Trim two 2x6s to eight feet.
- Cut remaining 2x6 into two 19 inch lengths.
- Attach 8foot 2x6s to 4x4 using a deck screw in each corner, overhanging an inch and half at each end.
- Attach 19 inch 2x6 end pieces to 4x4s using a deck screw in each corner.
- Cut 2x4s into nine 19 inch lengths.
- Attach 2x4s vertically, spacing 6.5 inches apart (8 inches on center)
- Cut 1x3 wood to 6.5 inches to make four blocks that are 3/4 inches deep by 6.5 inches wide.
- Attach blocks to the inside wall of the 2x6 to create hangers for hive racks. You can attach these between any of the 2x4 slats -- We chose the middle two spaces.
- Treat the cut ends of the wood or paint the entire bench to weather-proof. Leave to dry.
- Level the ground where you want to place the stand and position concrete caps so that they're under the 4x4 posts.
- Position the hive stand and place a hive on each end. You’re ready for bees!


It would appear that women have too many clothes and not enough closet space to hang them in without crushing them together - so, it comes as no surprise that women only seem to use 35% of the clothes they have hanging in their closets. best hangers
ReplyDelete